Friday, February 27, 2015

Furniture Friday: Two New Uses for An Antique Bedframe

 
We have a family friend who is fantastic at finding deals on garbage day!  He called one day to let me know that he'd found two bed frames and asked if I'd like them.  We had been sleeping with just the standard metal frame and no headboard, so I was excited to see these treasures he had found! 


And they were amazing!  Or at least two of them were amazing!  Two were in pretty bad shape.  Unfortunately it was the headboard from one set and the footboard from the other set.  The headboard and footboard did have similar lines so I figured with some good TLC, I could make them look pretty much the same.

The thing about finding items on the road, though, is that sometimes it just doesn't work out like you think it should.  Because they weren't from the same set or maybe because the vintage rails that I had to purchase separately, it just wasn't stationary enough.  Everytime we would get into bed, the headboard would rock back and forth and hit the wall.  You know those old cartoons where the person sits in the center of a brass bed and the headboard and footboard cave in toward each other?  It was a very, very little bit like that.  But it was enough to drive my husband crazy!

For a while we slept a little unsettled wondering if the bed would tip in on us or collapse to the ground.  And I started the search for a new bed.  Luckily I found one at a church yard sale (those are often the best!).  It was only $5!

Oooh, but I loved the lines and the look of that bed!!  I sold the headboard because I felt it was too large for my house and family needs,

 
And this is what the woman who bought it from me did.  She was getting ready to stencil it.  It is sitting in the rafters of her family's barn where they hold biannual flea markets.

For the footboard, because of wonderful Pinterest and for chalkboard paint our family now has a cute and fun message board.


 Yes, I'm ready for Easter!!  My favorite holiday!


Wednesday, February 25, 2015

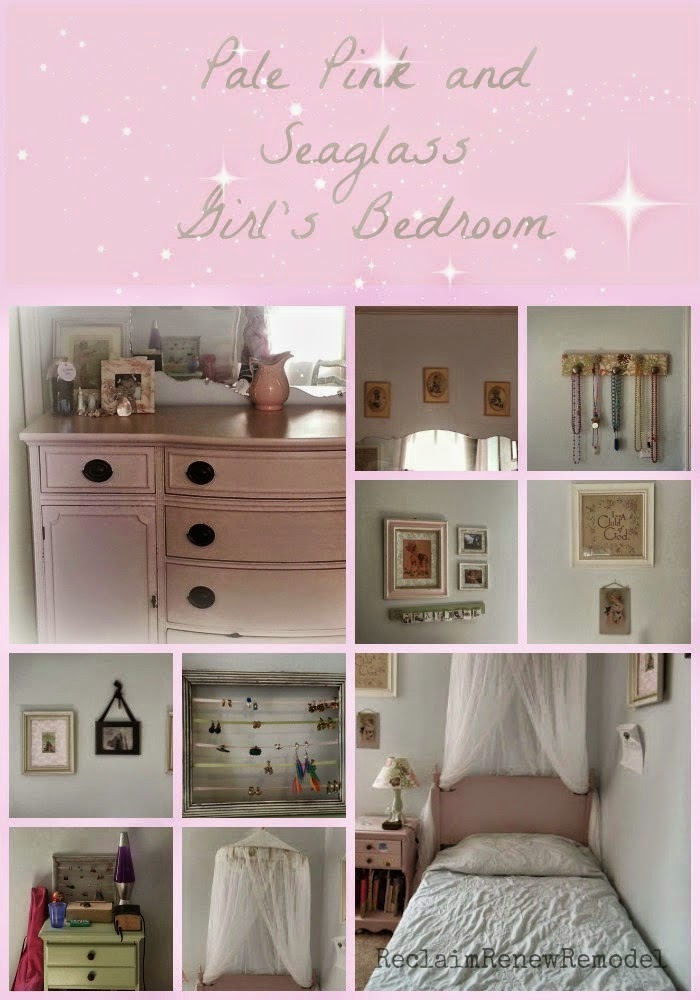
Whatever Wednesday: Seaglass and Pale Pink Girl's Bedroom


Before we start with the bedroom pictures, here's a visual of basic paint decorating using the 60/30/10 rule and we'll also mention decorating with the rule of 3s.   

Found this image at Color Wheel Harmony
The 60/30/10 rule.  We actually didn't follow the 60/30/10 rule exactly, it turned out to be more 63/25/12. This is fine to do because the "rule" is really a guideline; but I think it's best to stick fairly close to it.  Using this rule, usually the wall color would be 60% of color in the room.  We have a little more than the 60% from the blue in the bedspread.  Because we are a family who LOVES decorating with shades of white, and then using the 30% and 10% to add pops of color, for my daughter's room we chose "Blue Whisper" by Valspar.  Very subtly blue - but blue enough to show. 

The Rule of Threes. This is a rule for the 30% and 10% of color.  The room will look more cohesive when you add at least three 'pops' of the given color instead of just one.  So, in this room, the pink is added three to four times in various places.  And the green is also added at least three times.  It adds dimension and livens up the space. 


While we didn't stick exactly to the "Rule of Threes", because of the pink tulle on the bed canopy, our 23% pink is represented in the bed, the dresser, some artwork.
In this picture you'll see that her side-table was also pink, but we changed that to the seaglass green color to add more green to the bedroom (seen below). 

The 12% green: side table, table lamp, matte and job chart cluster. 

Friday, February 20, 2015

Furniture Friday: Upholstered Love Seat

When my parents got married, someone gave them this love seat/cedar chest as a wedding gift.  It had some pretty awesome 70s fabric on it then.


I remember it most, though, covered with a royal blue velvety fabric.  It was so soft!

(Sadly, we don't have any pictures of the blue velvety fabric covered love seat...but it was wonderful!)

You know how I LOVE cedar chests, so I was delighted when a few years after we were married, my husband and I inherited the blue love seat.  But...we like more beach-y colors, so I covered it with white canvas.  (It was actually called sail-cloth!)


Now, we are getting ready to move again and I can't decide what to do with it.  I like the white, but when I was recovering it, I mistakenly put the fabric grain on the top going left to right, and on the seat deck going top to bottom.  You can't really see it, but I'm thinking a new color fabric might be fun!  I also can't decide what to do with the wood.

Keep it dark wood?  Or white wash it?  Or what about liming it?

 What do you think?


Wednesday, February 18, 2015

Whatever Wednesday: Poster Print Couples Photo and an Antique Window Frame


Don't you just love antique windows?  They're so versatile!  But before I get into my love of antique windows, here's a story about a dress.

I was given a very old dress from a woman whom I called Grandma Dickerson. She wasn't really my grandmother, but she was an integral part of my life.  She was a fighter and a fantastic woman!  A few days before her wedding she was in a car accident that left her with multiple broken bones....but she wasn't someone who would let that get in her way!  Instead, she was married in a full body cast!  Another fun thing about Grandma Dickerson is that she had lots of sons, and one daughter.  Her husband was often away on business trips; when he was gone, she'd hand hammers and sledgehammers to her kids and have them take out a wall or help her get ready for some project or another.  Then when her husband returned (he'd be surprised but) they would work together to finish the project she and the boys had started.

Grandma Dickerson loved music and Christmas and popcorn balls!   She always came to my elementary Grandparents Day celebration at school because my own grandparents lived too far away.

So, back to the dress:  she had worn it shortly after she was able to get out of her cast, so that puts it somewhere in the 1940s.

For our ten year anniversary, I wore the dress for our couple photo.  It is one of my favorite! And since it's very, very good to put photos of you and your spouse in your bedroom, I wanted a vintage-y look for our new couples photo.

Enter the antique window.  I found it at a garage sale for just $2!  There are also architectural salvage places all over the place.  So, if you're on the hunt, you could try one of those places.  

Materials Used:

  • A large piece of cardboard from an unused box (free)
  • Antique Window ($2)
  • Black and White Poster print (I got mine from Wal-Mart for around $8) but if you want it even bigger for the same amount of money, check out Mandy's tutorial at Sugar Bee Crafts on Engineer Prints!
  • Elmer's spray glue (I had this already but it can be any price from around $3.80 to $7 depending on where you get it - Target seems to be pretty pricy and Office Depot had the best price that I could find).  
  • White Paint (had on hand, but around $3 for spray paint)
  • Antique Glaze (also had this on hand, because it lasts forever - $8.50)
Because I had most of the items on hand, this project cost me under $20.  
Black and white poster.
Place the window over the poster and see where it needs to be cut.
Cut to size.
Spray the back of the poster and the piece of cardboard with glue.  You'll want to wait for about 5 minutes after spraying, then slowly and carefully place the poster onto the cardboard.


Next just staple the cardboard to the window frame and voila! You're finished!


Friday, February 13, 2015

Furniture Friday: The Easiest Furniture to Upholster

I've taken a number of upholstery classes and have finished countless pieces of furniture by re-upholstering them.  So, I thought I'd share the one that you should start with if you're thinking of refinishing a furniture piece.

Dining room chairs, my friends, dining room chairs!


Have you ever vacuumed flour off of the carpet; or mowed the lawn when it was pretty tall?

The visual reward is immediate!

To me, that's how upholstering dining/kitchen chairs are.  You can take a nasty looking chair or one that is beat up after years of wear and transform it in under 20 minutes!  Bam! A new chair!


Some reasons why you might want to upholster dining chairs: 
  1. The upholstery is uneven
  2. And it doesn't match the chair's era
  3. The owners do not like the fabric that is currently on the chair
  4. You just need a change. 
  5. It's very rewarding in just a small amount of time!
Tools you may need: 
  • Your new fabric 
  • Scissors
  • Staple gun
  • Tack puller (only if you take off the original piece of fabric before putting on your new one)
  • Hammer - sometimes the staples need some help going into the wood

How to re-upholster:

Gather your desired material, this project is just canvas drop cloth:
 
Lay the seat deck onto the fabric and make your cut (I have four chair of this size so I doubled my fabric and cut two at a time).
 
This is illustrating the two pieces of cut fabric turned upside down opposite so that fabric isn't wasted even with the slight angle of the seat.
 
 Iron your fabric.  I've skipped this step before thinking that it was unnecessary.  I'd be stretching the fabric so I thought I could stretch those wrinkles out.  It turns out that stretching out the wrinkles is next to impossible!  You might not see them as much, but the finished project can't ever be as crisp as it is when ironed. 
 
Start by stapling the center of two sides first (I usually do the front and the back of the chair first but it doesn't really matter too much).   
 
Then put a few more staples into one side while stretching your fabric.  And then into the opposite side - again, while stretching your fabric. 
 
 Then you can start stretching your remaining two sides, starting from the middle.  It's important to try to stretch evenly from directly opposite of an in-place staple. 
After you've got some preliminary staples in to hold it in place, start stapleing like crazy.  Begin from the center staple and move to just 2 inches from the corner, and stop.

I don't know if you can see the tension on my hand, but I'm pulling the  fabric pretty hard and putting in as many staples as can sit by each other.  This makes the top of the seat look nice and uniform.
 How to do the corners:

There are common ways to upholster corners.  Here are two of them:  

With the reverse angled-ear approach you fold in the corner and then fold the two side flaps over it.  It's not as clean as I like it to look, but if you're able to get them even enough it can add a detail to your work that the other two ways don't show. 
 

My favorite are gift-wrap corners.  It is folded in much the same way that wrapping a box with wrapping paper would be folded.  Often I have to do some tucking and finagling, but I love how the top view looks (what everyone will see) when I'm through!  
For the third kind, the angled ear approach, check out this tutorial here.  She does a great job explaining how to make your finished project look amazing!

Some reasons why you might want to upholster dining chairs: 
  1. The upholstery is uneven
  2. And it doesn't match the chair's era
  3. The owners do not like the fabric that is currently on the chair
  4. You just need a change.
 Sit back and enjoy your work!


Wednesday, February 11, 2015

Whatever Wednesday: Embroidered Chemistry Onsies

Are you made of Copper and Tellurium, because you're  

My father is a chemist, but it was never one of my strong points.  However, that never stopped me from periodically quoting chemistry puns and trying to find as many chemistry-related things to 
me to make some fun gifts.  


And speaking of fun, chemistry related gifts, with Valentine's Day approaching, check out these fun Valentine Chemistry Printables from Kirstin at craftiments.com.  They are so cute! 


Ok, on to the topic.  Since neither my husband, nor I, are chemistist or really knowledgable in that area, but that I love finding chemistry stuff to make as gifts - it must have stemmed from my dad being hard to shop for....anyway, thank goodness both my sister and my sister-in-law married chemists!  

So I was able to make these:  


The onsies are from Micheal's.  The white fabric is an old sheet. 

I used a Mark-B-Gone pen to write the words.  I really like these pens because they just wash out with water.  Easy-peasy.  

 Cut it out and put some fusible interfacing on the back and pinned it on. 


 Then hand -embroidered it.  It took about 45 minutes to an hour to do the "CuTe" one. 


Monday, February 9, 2015

Make a Mix Monday: Homemade Nesquick vs. Copycat Hershey's Syrup


My goal with Make a Mix Monday is only to share with you what I've found while making a mix, sometimes from Pinterest, sometimes from a make-a-mix cookbook.

I've made the homemade Nesquick twice and found the same result both times: the cocoa does not dissolve well enough for my, or my family's taste, to make this enough like Nesquick. I've tried both this recipe and this recipe.  They both make great hot chocolate recipes, but for just plain cold milk and chocolate mix, we found that the cocoa tends to just float around in the milk and then stick to the stirring spoon when you try to take it out.


So, instead, we've had superb luck with copycat Hershey Syrup recipes.


You are getting the cocoa hot enough to dissolve and then you are able to add the syrup itself to the milk.

My kids LOVE it! And I haven't bought chocolate syrup since last year.