Thursday, November 29, 2012

Tips for Stenciling a Not-So-Plumb Wall


I stenciled one small wall in our home to (cover my imperfect mudding job) add a pop of interest.  But our house is old and like most old houses, the walls are not plumb. 

Mandy, my sister-in-law at sugarbeecrafts.com, made her dining room look very fancy by just stenciling her wall.
And it got me thinking how much interest stencils bring to a room! 

Wallpaper is a pain and my mom stenciled a lot of furniture and random objects when I was a little girl.  For those reasons, I thought that a wall in our house needed a good stenciling.

Luckily, said SIL had a few different stencils and offered to let me choose one to use in my home.  I loved her dining room wall, but when I got that stencil back to my house, it seemed too fancy for the little area that I was improving.  Since our last name (supposedly means) 'one who keeps bees', I chose a hexagon pattern that is reminiscent of a parts of a beehive but did it in a light turquoise so it wasn't too bee-ish.

I also chose to stencil this wall because it was new, and I am not fantastic at mudding new sheetroc - the stencil covered any and all of the wall's imperfections!


Tools for Stenciling:
  • stenciling brush (these have very stiff bristles and are usually rounded)
  • paper towel 
  • newspaper
  • paint, very slightly watered down
Stenciling Hints:
  • Water down your paint just a very little bit.  I take about a cup of paint and put around 2 Tbsp of water in it, then give it a stir (I've never measured, really, but I just turn on the faucet and let some water plop in - but I think it's about 2 Tbsp or a little over that).
  • The paper towel is to dab your paint off a bit.  Dip your brush into the paint, then give your brush a twist on your paper towel.  Then you can continue with the stenciling.
  • To stencil, keep your brush perpendicular to the surface your painting and "stamp" it.
  • Be patient
  • Stencil in order.  i.e. Left to Right, then let it dry and the left to right again, etc.


As you can see, this was a new wall and I wanted it to stand out a little.

My FIL showed me this little trick to cover imperfections on a new wall: mix sheetrock compound with your primer - about 1/2 and 1/2.  Then just roll it on.

The mixture.  You have to roll it pretty fast and not go over the same spot too often or it will come out uneven.  I was pretty nervous about trying it without Nate's dad here, but since I was covering it with stencil, it turned out that it didn't matter too much.

Finished wall with first stripe of my paint color.
So now to the stenciling: 
I used spray glue to help the stencil adhere to the wall as well as painter's tape.
For un-plumb walls, don't do it like this to "save time"!  You will have to paint over it and re-do: be patient and wait for one side of the wall to dry, then do the area right next to it...

....otherwise, you end up with this!  See how the two stenciled portions are too close together?
Remember the instructions on stenciling? Don't get in a hurry and glob too much on your brush or say to yourself: "It will be ok if I don't dab it this time" because then you'll have to spend more time going back to 'fix' the unclean lines.

Yes, go in order; left to right OR right to left Or up Or down, just be consistent and stay next to the place where you started.


Much better!  Here I waited for the one section on the right to dry, then moved on to the one in the center, and then the left and so on.  Then I was able to start again on the far right side and move toward the left again. 


Wednesday, September 19, 2012

Dresser to Entry Shoe Storage cabinet

Years ago my father-in-law suggested building a half-wall in our entryway.  I was hesitant to do so because I thought it would make our small living room look smaller.  I've changed my mind and decided that he is an architect and probably knows what he's talking about.  BUT, now our building projects are pretty much finished and... I don't know, I just don't think we'll ever actually build a half-wall there now.  So, when my son's dresser was not working for him because the drawers were too big and bulky, and when I found this feminine one at Salvation Army. 
Deciding it was fit for my daughter, I then gave the my son flowery one which was mine when I was a child. (Of course we painted it a more suitable color for him.) 

And what did I do with his old, horrible one? (Which I got on Craigslist, BTW - always check the drawers before purchasing! - it was a beautiful dresser, but only 4 drawers and the two bottom ones were terribly annoying.)
Well, I saw something like this on Pinterest, thought it was a brilliant idea and knew that this cute dresser could have a better use.
Here is the dresser after being in Max's room for a while (he's liking red with neon green currently).  See the drawer opening crookedly - grrrr.


Wonky drawers.


Checking to see if the basket will fit...nope!
Dresser after hammering the front strip of wood out.
Used some left-over wood for a computer desk we're building that we cut incorrectly.
Measure Twice, Cut Once!
Using a table saw is a more sure way to make straight cuts (than, say, a jig saw).
The leftover piece on this board is from the wood bucking.  Luckily this thought came to my mind before it actually happened: "the wood is about to buck back at you, so be ready".  It was a little freaky, but I was basically finished with the table saw.  To get the leftover piece off of the shelf base, I worked the side with a hammer and the sander.
Placing the newly cut piece in the dresser.
Since it was bowed a little, I screwed in the side pieces, then nailed around the rest of the edges.
Without the drawers the space in the back is very noticeable!
I decided to use the piece from the front of the original dresser (that I had hammered off) to fit in the back space (above).  Luckily all I had to do was cut off the little end there.
Just a note, clean the dresser of cobwebs before painting.  ;-)
Dresser/shelves being primed with paint.
With add weight for the shelf (since I want it to hold shoes) and only support on the sides, I felt it needed some support in the center. 
And Voila! A beautiful serene entry/storage table:


Tuesday, September 11, 2012

This one's not a tutorial, just fun stuff


I'm not sure if anyone else has been invited to a party that had a stipulation that if you came, you'd need to blog about it....but...it is worth it, my friends, IT IS WORTH IT!

My sister-in-law called to tell me that she had received some ponies from this company, Pony Royale, but she needed to get at least 3 other bloggers to attend.  Luckily for me, and my daughter and niece, we were invited!

I was picturing the cute little My Little Ponies (which I like), but when we got there the girls were enraptured by many kinds there were (one for each month of the year - with their own little story and birth stone's to match).  I was excited that they looked like real horses and that their heads move.
Each pony came with it's birthstone on it's forehead and with matching headpieces, tails, manes and saddles.  But even nicer, is that they also came with coordinating colors as well, so that the girls could change out the blue tail (Dewdrop) with a more realistic-looking brown tail and mane.

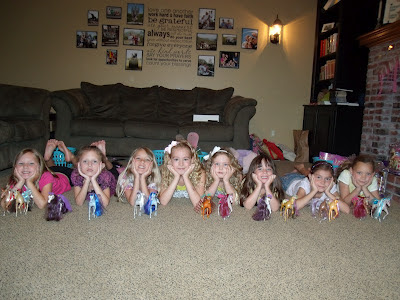
The girls all loved and squealed with excitement when they chose their ponies.  But you can't see it in the pictures; I guess they were trying to pose nicely so you don't see the enthusiasm until they were caught playing. 

Deciding which one they want the most.

My niece, happy to show me hers.

My daughter, content with her selection.

Another niece showing me her new pony.

Changing out the mane - this is cool folks!

Choosing different tail to put on her brown pony.

See them lining them up?  They sat and played like that for a long time.

Monday, August 13, 2012

Cosco Stool re-do: Cleaning Chrome and Using your Glue Gun to Upholster


Let's talk about how to clean chrome with stuff you have hanging around your house.  AND let's talk about using your glue gun to put fun new fabric on your metal furniture:


My grandparents have a few (or more) of the Cosco stools like this one and even this one but the one with all the great memories for me was this one.  That stool sits in their kitchen near the peninsula.  Every evening that I visited, my grandfather would sit on the stool and say "Wouldn't you like some ice cream before bed?" and he would proceed to scoop great mounds of ice cream into a bowl while sitting in the stool.

 
How could I not want a Cosco stool after so many fun and delicious memories?  So, I've been on the hunt for one for a while.  But those stools are expensive!  I did find one from the 80s at a garage sale, but it wasn't quite right, nor was it as sturdy as the "vintage" ones.  But I found this one:  It isn't as old and wonderful as my grandparents' but it had potential.


The chrome had paint and black marks all over it.  So, I found some 90% rubbing alcohol and some aluminum foil and gently scrubbed it off - (It came off so easily!!)


 That's it, two items you probably have in your house!  Aluminum Foil and Rubbing Alcohol!

It also had some ugly, ripped white vinyl cover on the seat.  I pulled it off to make way for the new fabric.                                        
I covered the entire chair/stool with paper, tape and an old towel so I could spray paint it. 

Deciding which fabric with sea green and orange will look best.

Tracing the old vinyl.

Craft spray glue to attach the fabric.
And then glue the edges to the metal using your glue gun.  (You can see a video tutorial on another Cosco stool I've done with a glue gun here.)


Maybe someday I'll have one as old and as sturdy as Grandpa Gillis', but in the meantime, I really, really like how this one turned out.