Friday, January 30, 2015

Furniture Friday: Fireplace Built-in for DVDs


My friend, Cammy had a problem.  Her living room focal point, the gas fireplace with a spot for her t.v., was often disheveled.  When they got opportunities to watch a movie together it would take ages to find one because the movies were haphazardly placed anywhere they'd fit on top of the mantle.  She is a wonderful mother to five boisterous kids, has a great husband who is in the military, and has a natural desire to let tidiness in her home bring peace to the whole clan.

While I was visiting one day, she mentioned how the state of her DVDs were a little frustrating.  I suggested building two shelf-towers on either side of the fireplace for storage.

We didn't get step-by-step pictures because we were trying to finish it really quickly (in just one day and still be able to take our children swimming).

You can get an idea of how to make one here and here.  But this is basically what we did:

  1. Measured our available space and divided it so that the shelves would be symmetrical to one another on each side of the fireplace.
  2. Measured the DVDs so that we made each shelf the correct height.
  3. She didn't own a table saw, nor did I lug mine over to her house, so we used a circular saw to make our cuts.  This made pretty rough cuts and not all of them were straight, but with a good dose of caulk and some paint, it worked out just fine.
  4. Nail-gunned the pieces together.
  5. Caulked like crazy!
  6. Painted.
  7. Then put into place next to the fireplace.
  8. Another bit of caulk to make it look seamless and like it was built by the spec home construction team.
  9. Touch up paint.
  10. Done!
Did I mention that I LOVE built-ins?!  Love 'em!

Wednesday, January 28, 2015

Whatever Wednesday: Everything in it's place...even the little things.

Does anyone else have a ton of store mini cards that hang on your key ring?  They are great and save money, but they certainly weren't saving me time!  Nearly every time I stood in line, I stood searching for the right little rectangle.     

With that quote in mind, I decided that the little things were included in "everything" and made a quick, easy change: by separating the cards from my key chain I find them much more easily and my keys by themselves can fit into my pocket.   


Friday, January 23, 2015

Furniture Friday: Just a table and some chairs

A few days before I was suppose to move, a friend from church asked if I could help her refinish her kitchen table and chairs.  This table was beautiful, but it had years of wear and tear and needed a refresher.   So, knowing that it wouldn't take too long (ha!), I headed over and we started working.  (I thought we could do it in about three hours, but it took about five or six because I didn't count on the humid weather extending dry time - so it was two mornings worth of work.)

We used Glisser Sanding Deglosser to make the previous finish tacky so the burgandy color she chose would stick.  We taped off the top of the table, because, look, it still looked great!  And  painted the legs to match the chairs. 

Because I was in such a hurry to finish and get back to packing, this is the only snap shot that we got.  But it turned out nicely didn't it?  And now it matches the curtains and valences she had made for her kitchen windows and sliding door. 


Wednesday, January 21, 2015

Whatever Wednesday: Webbing, Burlap, and Felt Valentine Garland


Remember the green chair that I tried to use red webbing on? Well, I couldn't let that webbing go to waste! So, today I made a Valentine garland using the webbing and some materials from my sewing cupboard and from Micheal's. It cost me $4.

The webbing and some burlap hearts from Micheal's.

I gathered my materials. 
Laid out the different design options.


Decided I wanted it all to be a cloth of some kind instead of the red paper hearts that I had on hand.


Sewed it together with some red jute string.

And hung it up.  Quick and easy. 


Monday, January 19, 2015

Make a Mix Monday: If you can't can it - make it a mix!


I've been really excited about making my own cream of chicken soup.  Not having all the preservatives and ingredients that are difficult to pronounce just is a wonderful prospect!  So, I searched Pinterest and found some great recipes for Cream of Chicken soup.

I even made some and found that I had so much leftover that I couldn't use it all fast enough!  This recipe is so delicious!  I have a tiny freezer though and can't fit all that the recipe made in it.

Homemade Cream of Condensed Soup by Deliciously Yum!

This got me searching the internet to see if I could can her recipe (it was so yummy!).  Unfortunately, I found that "Creamed soups are not suitable for home canning because their ingredients interfere with the proper transfer of heat during the processing step and can result in food borne illness. Freezing some soups is a safer option." And "adding flour or other thickening agents to a product for home canning, prevents the heat from penetrating to the center of the jar interfering with safe processing to destroy the bacterial spores that cause botulism."  And also, "Butter, milk, cream, cheese and other dairy products are low acid foods that should never be home canned." Penn State Extension 

I then started looking for recipes without dairy products and found this recipe from justapinch.com. Instead of flour or cornstarch she uses Clear-jel as a thickening agent.  The only thing I don't like about this is that it's not very creamy. 

Homemade Cream of Chicken Soup to Can Recipe

So, on to more research...In a previous post, I referenced the Utah State University Extension office.  Low and behold, they have a fantastic cream of chicken soup MIX recipe!  I didn't even know a mix for cream of chicken soup existed!

 Now, I've made the mix, I've made some soup, and three of the four of us LOVE it! (My son only likes hot dogs, pizza and peanut butter - 13 year old = picky eater.) 


The recipe and many others are here.  I don't have any affiliation with USU, nor did I ever go to school there, it just has a lot of great recipes!  And I didn't get permission to put the recipe here, though it is from a booklet that they let anyone print on their own computer. 

What I like about this recipe is that it calls for the mix, water, and butter.  It made it simply scrumptious!


Since finding the recipe online, I found a few more soup mix recipes to try on Pinterest. 
http://www.cuckooforcoupondeals.com/training/homemade-cream-of-something-soup-mix/
http://kottinthegarden.blogspot.com/2013/03/diy-dry-cream-of-mushroom-soup-mix.html?m=1
http://savingslifestyle.com/2014/02/homemade-cream-of-something-soup-mix/#_a5y_p=1303253

Friday, January 16, 2015

Furniture Friday: Old Steamer Trunk turned Cedar Chest


When in high school, I had the opportunity to help out on an Eagle project where we all got together to re-model a house for Habitat for Humanity. (Well, remodel is used loosely because we really brought the house down to it's studs and built it back up from scratch, but that's beside the point.)  Up in the attic of this house, there were a few items that they offered to any of the helpers.  So, I picked up an old beat up steamer trunk.  This is probably the beginning of my love for finding "junk and turning it into useful household items".

Since this was years ago I don't have a before picture, but it was heavy, black, and without handles or lock.  But I loved it!  My parents were big on Hope Chests for my sister and I, and after talking it over with my dad, we came up with the idea to turn this old steamer into my Hope Chest.

You may remember that I love cedar chests.  So, my dad headed to the lumber yard for some cedar panels of 1/4" thickness to place in the trunk.

The cedar panels were just placed on the floor of the trunk. Then the sides were glued into place with an occasional nail to hold them more tightly.  He even made a tray with the leftover cedar so that I could utilize all the storage!

 He even made a tray with the leftover cedar so that I could utilize all the storage!
 It has been working wonderfully for almost 20 years to hold extra blankets and sheets for us. As with all cedar, when it starts to lose it's smell, we give it a light sanding and it's back to keeping our sheets smelling great and keeping bugs away.  

For the top, we used Mod Podge to place the wall paper which had been on my bedroom wall when I was a very little girl.  I LOVED that wall paper! And we added the Victorian picture as well.   

This would look great painted it's original black with some oil-rubbed bronze decals don't ya think? 

Wednesday, January 14, 2015

Whatever Wednesday: 5 Easy Snowflake Crafts

Today on the blog, I've found some cute snowflake crafts to share. They are easy, inexpensive and/or use recyclable material!

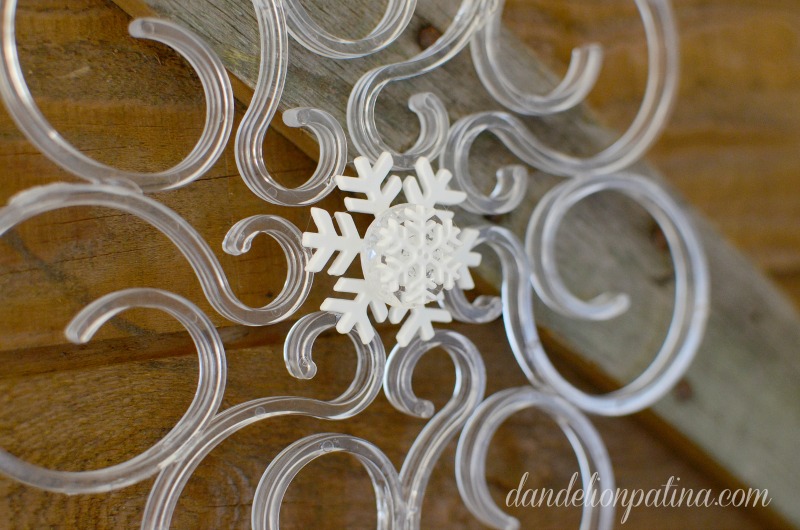
I LOVE Michelle's cute idea using clear banister clips!
DIY Winter Snowflakes by Dandelion Patina {Guest Post} at The Everyday Home #winter #diy  #crafts  #winterprojects


Bethany at Pitter and Glink gives us step-by-step instructions on how to make snowflakes with a glue gun! Cute idea!  
 

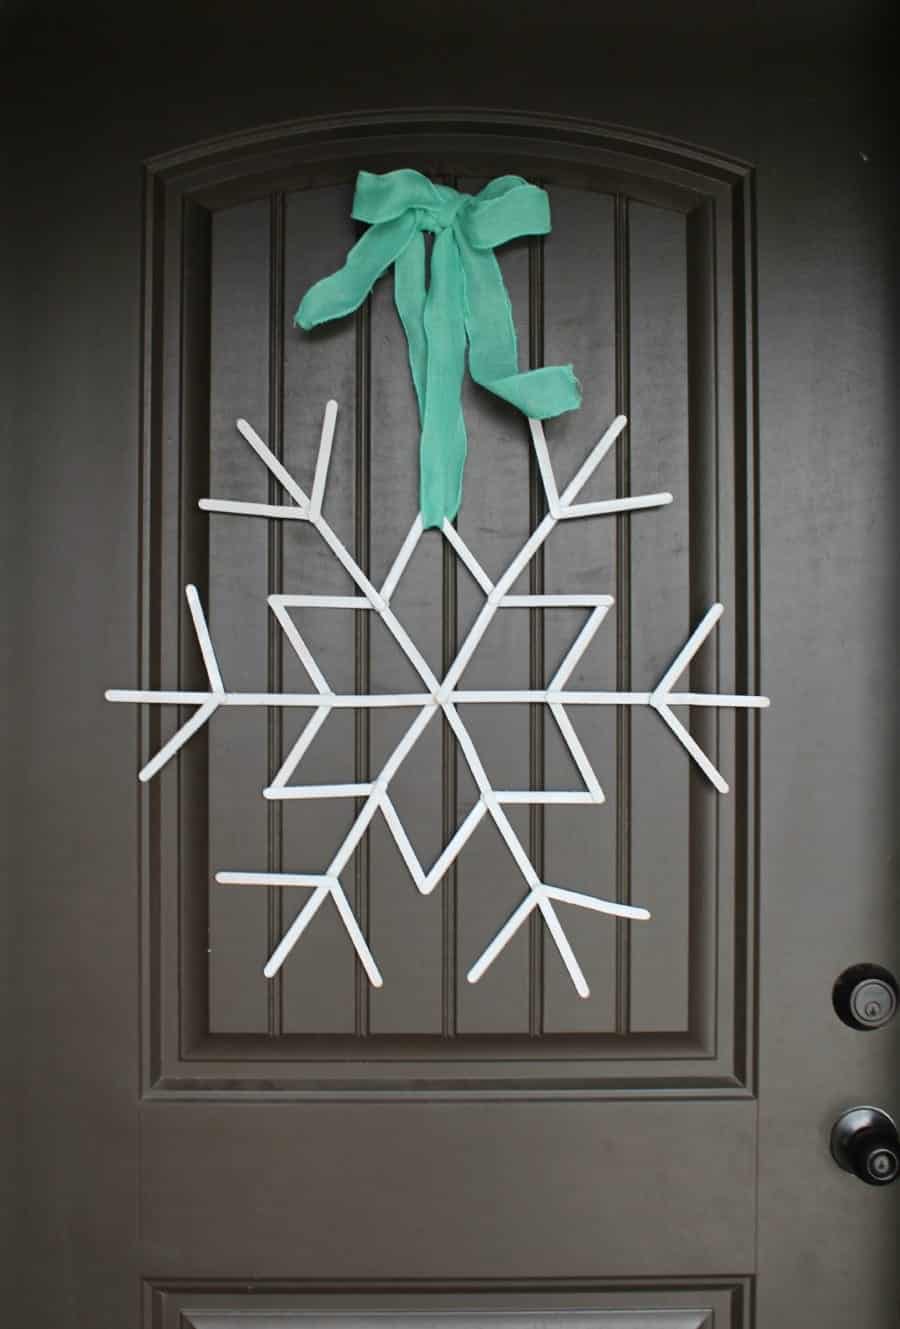
 And Snowflakes from Popsicle sticks are a such a breeze!  Kimbo, from Girl and a Glue Gun, guest posts on SugarBeeCrafts with a fun tutorial.
Popsicle stick

 The tutorial is a video and really easy to follow. By MyRealityBites.
 
Before Christmas, I was at a thrift store and found these amazing looking snowflakes made of 6-pack plastic rings.  Aren't they great?!  
I loved this idea of using the plastic rings for this because years ago, I took my children to the Shepherd of the Hills Fish Hatchery in Branson, MO, where they have a live turtle, very much like this one:
After seeing what the harmless looking piece of plastic can do to a Red-eared Slider, I was a little more cautious about just throwing the rings out.  Instead I began cutting each circle before throwing it away so that nothing could get caught in the plastic.  BUT...making them into snowflakes is such a fantastic idea!!  It's on my to-do list for January!

 Borax Crystals Snowflake
(see tutorial below)

Using borax to make crystals is such an easy project!  For the recipe check out the tutorial here.  My children, their friends, and I, made these a couple of years ago, and I'm still using them!

Gather the pipe cleaner color(s) of your choice and lay them out.
Cut each pipe cleaner into three pretty equal parts.
Make an X
And then lay the third piece over it.
Then twist all three pieces at the center and tie some string around one tip.
Tie the string onto a stick, Popsicle stick, or other like-object and set aside.
Boiling water
1/3 C Borax to 1 Quart jar of boiling water (but I've found that if you just keep adding the borax until you can't dissolve it anymore (I think I put close to 2/3 cup in) then you get lots and lots of crystals).
For other hints, check out when I made Borax Valentine's hearts here.


Side-by-side, before and after the crystals had formed.
Last year, I made them into a garland  to hang in our front window. 
See how after a year they are oxidized and not sparkly? But I felt like they were still snowflake-y 
And kept them to hang again.