Friday, August 28, 2015

Furniture Friday: Painting a Piano


Remember this post here where I said: "I can't even get myself to paint or stain my piano, it seems sacrilegious!"  Well...sacrilegious as it is, I suppose if someone were to ask me for help in painting a piano, then I might comply.

So this week, I was piddling around, working on my to-do list, ready to cross items off when I recieved a text asking if I could help another person to paint her piano.  Thoughts: What?! Crazy! But I said:  "You know I'm not really into painting pianos, but...ok, why not!"

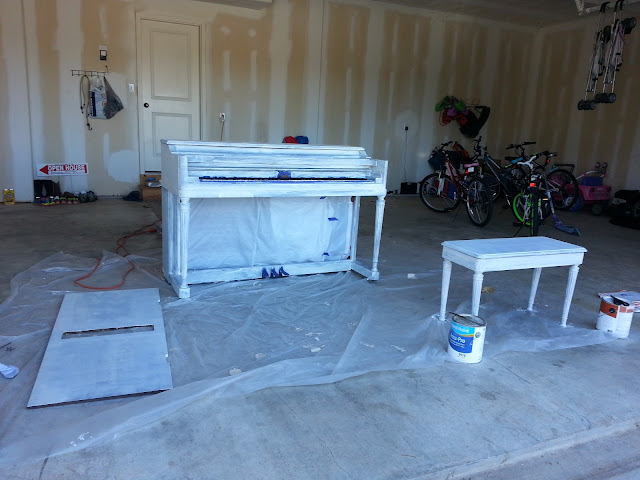
And so, it happened.  We took three days to work on it; one day to prime it, one day to paint it, one day to protect it.  And it was F-U-N!  It was fun because I got to meet a new friend, and work with three other great ladies! 

Here are the preparations we made:  
  • Cover the back wooden part of the soundboard with plastic and tape it really, really well
  • Cover the front brass ridge and spring soundboard with plastic and tape it really, really well
  • Put painters tape at the back of the keys near the felt stoppers, this, I hoped would keep the paint off of all parts of the keys and their mechanisms - it seemed to work really well! Because then we:
  • Put an additional amount of tape the entire length of the keyboard attached to more plastic and lots of tape to keep it sealed.  (no picture, sorry)
  • Sand or apply a sanding deglosser *
  • Prime with Kilz 2 or Zinsser (they're my go-to primers)
  • Do a light hand sanding
  • We painted with a spray gun!   
I'm still nervous a little thinking about it, but it worked, made a beautifully smooth surface and our preparations to cover all the working parts of the piano seemed to work perfectly! WHEW!
  • Since we used latex paint, and we live in a very humid climate, we then added Polycrylic to all the large surfaces. This gives it a strong, protective coating and keeps piano books, and anything that might be set on top of the piano, from sticking. 
* A note about the sanding...if you do decide to sand, make sure that you don't sand too much.  
It doesn't matter as much when you're painting, but if you were staining, the stain has a hard time sticking to wood that has been too stripped.  On this project, however, because there were some places sanded down to the wood, when we painted, the places where the stain met the bare wood bled through both the primer and the paint!  So, be cautious on the sanding, or just use some sanding deglosser (Kleen Strip makes some) (see what it looks like in this post here).    


But if I were ever to do this again, here's what I'd add to the preparations above:  

It just so happened, that my piano was being tuned on the third day of work on my friend's piano so I was able to learn something about how the piano comes apart which would have made it easier to paint. 
  • On many upright pianos, the front face (where you lean the music books) will come off - next time, I'd take this off, because:
    •  It would allow us to get the plastic and tape more secure on the inside of the piano 
    • We could sand the sides (that aren't seen) so that the paints on two surfaces won't rub against each other and keep the surface smooth
  •  Once that part is off, the piece that covers the keys is able to come off.  It make work differently on different pianos, but that's how it works on mine.  
So...if you paint a piano, good luck.  Spraying it did work because we took the time to cover all the important parts.  

What do you think?


Wednesday, August 26, 2015

Whatever Wednesday: Roadside Find; large metal clock


 A friend of mine was driving through her neighborhood almost two years ago and found this metal medallion sitting on the curb with the garbage.  Knowing that I love finding new life for old things, she called me up and asked if I wanted it.  At the time I was getting ready to move and didn't think I would want to being moving an additional piece of metal along with all my other project junk (we will call it junk until it has a purpose).  But it's shape and design intrigued me, so, of course, I took it.  It has since moved twice and I finally have a place for it!


Right on the mantle of our new home.

While I really liked the way it looked before, I wanted some of the dark teal and oil rubbed bronze that bedecks the rest of the house.

So I spray painted it dark teal.


Then added oil-rubbed bronze on top.


Sanded the oil-rubbed bronze off in some spots, which brought out some of the dark teal and some of the previous gold/mustard color.

Then added dark teal clock hands for additional color (and so we could actually see the clock hands against the bronze).


Originally I was kicking myself for spray painting this piece because it was very well done and had dimension to it, but this is growing on me. And...it matches everything else in the house. 


Friday, August 21, 2015

Furniture Friday: The Wonky Side Table (another family heirloom)


When my grandmother downsized from her long-time house to a place with lots of other friends her age, she gave me a whole lot of furniture and family heirlooms.


This furniture piece was hidden under years and years of family life debris, down in her basement, under the stairs.


She said that her grandfather had made it.  But she didn't say what it was for.  It could be that she didn't know or doesn't remember herself, either way, it's a mystery to me!


Wednesday, August 19, 2015

Whatever Wednesday: Family Meal Planning (for the school year)

We're trying to live on a better budget. One that includes accounting for every penny (well, that's how I look at it, my husband says almost every penny is ok too). 

To help our budget, we are planning out our meals. The only problem is that we don't all enjoy the same things. 
Don't get me wrong, we like a lot of the same things, but my teenager would prefer to have pizza and hotdogs at most meals, my husband and daughter, Mexican and Chinese, and I would like to have casserole type dishes. 

So, we sat down and passed a piece of paper around giving each person a chance to write one thing down. Then pass it on to the next person to write one things down, and so on and so forth. 

First we started with main dishes.
Next we added our favorite vegetables and fruits.
Then our desserts (because we HAVE to keep that in!) 

It turned out pretty well and we are now ready for good meals, that we can agree on (because we each know that our favorite meal will be coming soon) that won't break the bank.


Friday, August 14, 2015

Furniture Friday: Sagniaw Exapandomatic

I just got back from my grandfather's funeral.  He was 91 years old and was such a great grandpa!  He taught me so much about loving work and the wonderful results that can come from work done well. He gave me my love for making something that is old and tired look nice and renewed.  Grandpa Gillis showed me how to ride my bike for hours, how to get off of it and explore, or stop mid-ride to help someone in need.  He was a great man who loved his family and loved life.

For Furniture Friday, because I was at their home, I remembered this lucrative piece that my grandparents have had since they were married.  Isn't it beautiful?  The details in the trim, and the grains in the wood, it's in pristine shape.

But the thing that is really my favorite about it, is that it's not a side table or a dresser...it's a table!
Those drawers on the front are just a facade.  The right side opens to reveal leafs for the table and my ever inventive grandpa, added a spot to hold my grandmother's silverware.

I've tried to find this piece before, so my husband and I could have one in our home (you know, I love furniture pieces with double or hidden purposes, like Murphy beds, etc.).
But there were very few of these made.

Today on Ebay, though, I found this piece that is almost just like it so you can check out how it works.

Such fantastic workmanship!!  I get the feeling that the 1950s was a time to utilize furniture in a new ways to save on space in smaller homes...and I love that!


Wednesday, August 12, 2015

Whatever Wednesday: Peanut Butter Balls for your Pup (so your dog will take it's medicine)


In the somewhat manicured and controlled environment as our suburban yard was, Polly, our Weimariner-Mix pup, kept pretty safe and her paws were usually in pretty good shape. 

Now that we live in the country, however, we're discovering a few things about keeping her well.  

Last Thursday found her limping around on just three legs.  She had an abscess on one of her paws that required a visit to the vet and three kinds of medication, one for pain, an antibiotic, and Benadryl (for good measure?).

After shoving these down her throat just one time, and the lovely experience that that was, I remembered how much she enjoyed it when my kids shared their "mud balls" with her and decided to make some just for giving her her meds.

So here's some peanut butter balls so your dog will take it's medicine:

 Pull out your peanut butter and some nonfat dry milk. 
 Get your pills ready.
Peanut butter (about 1 1/2 cup)

Dry milk (about 1 cup)

 Start pouring the dry milk into the peanut butter.
 Mix.
 Continue mixing until the peanut butter is no longer sticky enough to stay on your fingers, but almost the thickness and texture of butter cream frosting.

Form the peanut butter-milk mixture into small one inch balls. 
 Stick the pills into the balls and watch your pup enjoy taking her medicine. 


It turned out to be a great idea, because then just two days later, she came back from "getting busy" with a ripped foot pad!  After another visit to the vet we're recognizing that living in the country is a little rougher on dogs, but now she is taking those pills like a champ! 


Friday, August 7, 2015

Furniture Fridays: Projects in the Works

Works in progress, these pieces of furniture are all waiting to be finished. 


Wednesday, August 5, 2015

Whatever Wednesday: Black-eyed Susans and a Vintage Kitchen Scale

I thought I saw this idea on Instagram, but can't find who did the original posting.  But I loved the idea of placing fresh flowers smack-dab on my kitchen scale, that I had to give it a try. And I love it!
 

Monday, August 3, 2015

Make a Mix Monday: Mixes for the Upcoming Schoolyear

It's August, which means that for many of us the school year is approaching...fast (too fast for my taste)! 

I thought I'd share some of my favorite mixes that help me get a good breakfast on the table quickly, lunch ready in a jiffy and suppers hot before heading out for all the extracurricular activities. 

Breakfasts:

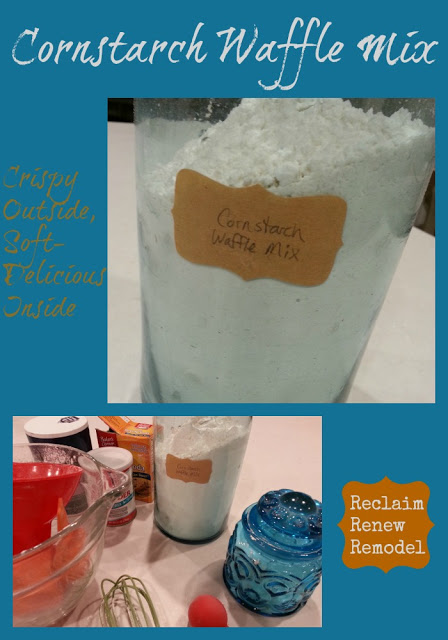
For some warm, perfectly made waffles, try this Cornstarch Waffles Mix.  My kids have loved these ever since their grandpa made them five years ago!


For sausage-cheese balls, pancakes or waffles, try this all purpose Bisquick copycat recipe:

HOMEMADE BISQUICK BAKING MIX

  • 5 Cups All Purpose Flour (I used unbleached)

  • 3 Tablespoons Baking Powder

  • 2 Teaspoons Salt

  • 1 Cup Butter or Shortening (if you use butter it will need to be refrigerated, but it doesn't contain trans fats and nor is it hydrogenated - see my explanation on butter vs. shortening.


If you are looking for oatmeal for breakfast, here's the post with links to 12 delicious recipes!

Lunches: 

Tortilla Mix. My kiddos love to bring wraps and even quesadillas to school for their lunches.  Their schools have a microwave that the kids can use!  (I don't ever remember having that option when I was a kid!)  


But an even better crowd pleaser is pizza! And when it comes in pocket form, it's always a winner!  I love that you can make this into a mix and/or just make them an pop them into the freezer for a lunch when you and the kids, and the husband, are in a hurry.  Check out Karrie's recipe for  Homemade Hot Pockets at Happy Money Saver. 


Dinners: 

This recipe for cream of chicken soup mix is still my most used and most loved dinner mix!   When making casseroles, cream of chicken soup is a given. But I've used this for gravy on potatoes, meat, in the crock pot, etc. I love it!

Another highly versatile recipe is, of course, onion soup mix.  Delicious! 


And this ranch dressing and seasoning mix is a crowd pleaser! 


And for the mix that does just about everything for every meal, this amazing site has the mix and recipes for everything from cookies, brownies and cakes, to quiche (they called it spinach and cheese pie), cornbread, biscuits, and pizza!  Ready-Quick Mix - the mix that does just about everything!

So what are you waiting for?  Start your mixes today to make those school days go by a little more smoothly!